Previous
Configure an arm
If you have a gripper, camera, or other components attached to your arm, you can configure them to move with the arm.
You can also take into account passive objects attached to the arm such as a camera mount to avoid collisions.
If you have a gripper, you can configure it to move with the arm. See Configure a gripper for instructions on configuring the gripper itself. Then, configure the gripper’s frame to describe its position and orientation relative to the arm:
In the CONFIGURE tab, find the gripper’s configuration card.
Click + Add Frame.
Select the arm’s frame as the parent frame.
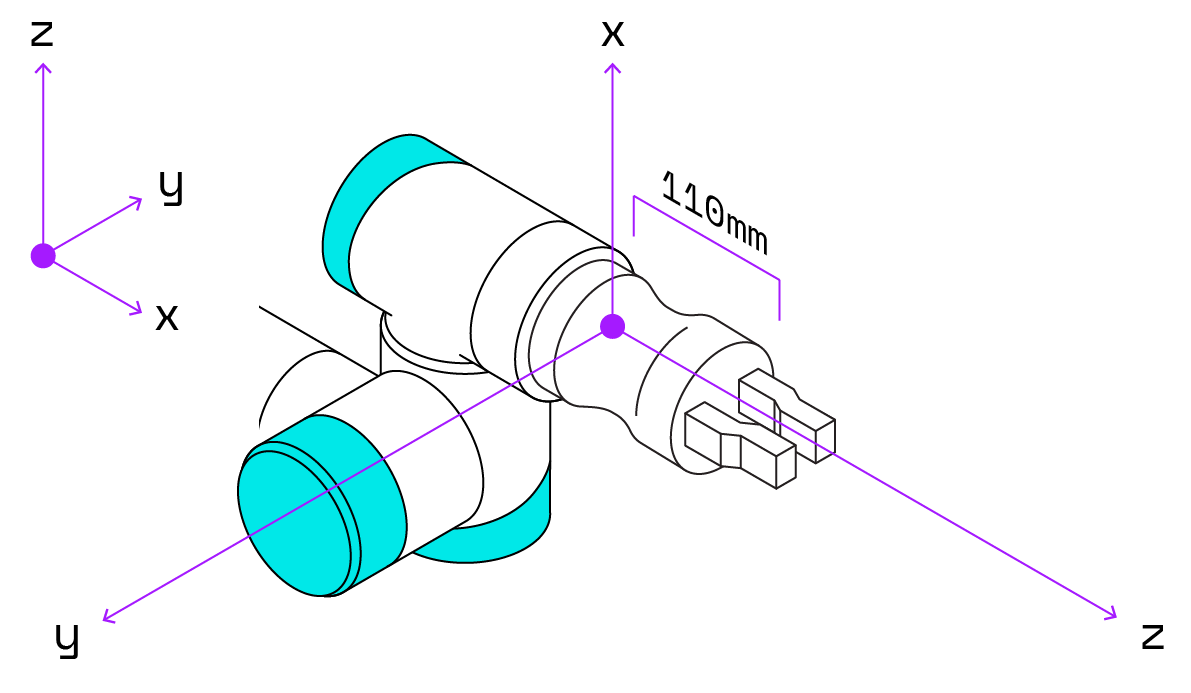
Enter the gripper origin’s position and orientation relative to the center of the end of the arm. It is up to you to decide what part of the gripper you want to use as the origin of the frame. It is common to use a central point near the base of the gripper jaws as the origin.

For example, the gripper in the image above has a translation of 110 millimeters in the z-direction, and it is oriented along the same z-axis as the end of the arm but is rotated 90 degrees around the z-axis, so its frame configuration is:
{
  "orientation": {
    "type": "ov_degrees",
    "value": {
      "th": 90,
      "x": 0,
      "y": 0,
      "z": 1
    }
  },
  "parent": "my-arm",
  "translation": {
    "x": 0,
    "y": 0,
    "z": 110
  }
}
If you have a camera that can see the environment, first configure the camera itself.
For example, you can use an Intel Realsense camera by configuring the realsense component according to its documentation.
Then, configure the camera’s frame to describe its position and orientation relative to the arm:
In the CONFIGURE tab, find the camera’s configuration card.
Click + Add Frame.
Edit the frame depending on where the camera is mounted:
Set the arm’s frame as the parent frame.
Enter the camera lens’ position and orientation relative to the center of the end of the arm.
Leave the world frame as the parent frame.
Enter the camera lens’ position and orientation relative to the world frame.
If you have a passive object attached to the arm such as a camera mount, you will want the motion service to be aware of it to avoid collisions.
You do not need to configure the object as a component, because you won’t be interacting with it through a Viam API.
Instead, you will pass it as a transform object when you call the Move motion service API method.
Was this page helpful?
Glad to hear it! If you have any other feedback please let us know:
We're sorry about that. To help us improve, please tell us what we can do better:
Thank you!